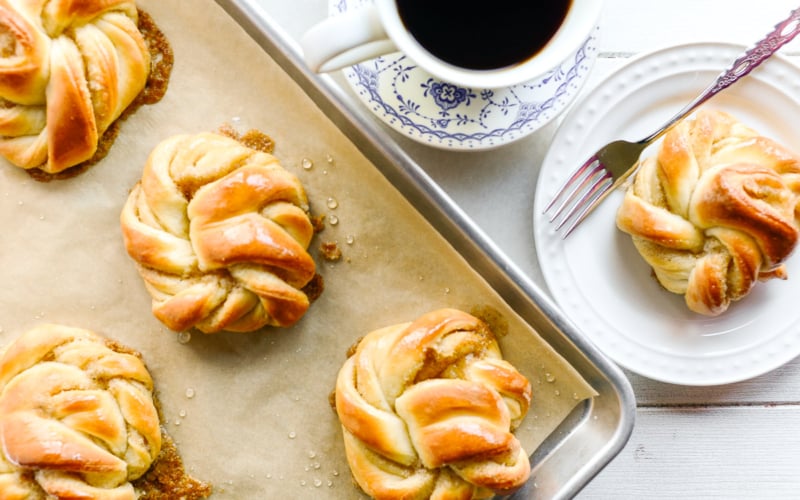

Swedish Cardamom Buns are soft, plush sweet rolls with a fragrant cardamom sugar filling. This easy knotted pastry is beyond delicious and so easy to make, I’ll hold your hand through it, step by step!

cardamom buns are a sweet ‘fika’ tradition in the Nordic countries
The Swedes have perfected the art of the social coffee break, or fika. It’s like the British afternoon tea ritual, and these cardamom buns are the perfect way to experience that rejuvenating tradition. (In Finland they have a loaf version, called pulla.) Cardamom buns are the Scandinavian equivalent of our beloved cinnamon rolls here in the US. They are not difficult to make, and the unique flavor of the cardamom filling paired with the vanilla glaze is just indescribably delicious.

If you read this blog regularly you may know that I adore cardamom. From the moment I tasted my first cardamom muffins I was hooked. I’ll often switch out cinnamon for cardamom in recipes, just for a new and exciting flavor profile.

what is cardamom?
Cardamom is a spice native to India from the ginger and turmeric family that grows little seed pods filled with tiny black seeds. It’s used in Indian, Middle Eastern, and Scandinavian cuisines predominantly.
Green cardamom is used in both sweet and savory dishes: I’ve used it to make everything from ice cream to meatballs. It’s essential for making Turkish coffee.
What does cardamom taste like? It’s described as piney, floral, and aromatic, with a touch of menthol or resin. It’s unique and hard to describe, but trust me, it’s lovely.
You can use pre-ground spice or grind your own from the pods. The correct way is to remove the little black seeds from the pods and grind them in a spice grinder or a mortar and pestle. You can also buy ‘decorticated’ cardamom seeds, which have been removed from the husks, ready to grind.
You can also use the pods whole in savory dishes like chicken with cardamom rice and biryani. Crack them first by rolling over them firmly with a rolling pin. Use both the pod and the little black seeds.

what you’ll need to make cardamom buns
These divine breakfast rolls are made with pantry staples…
- all purpose flour
- sugar ~ granulated
- yeast ~ make sure your yeast is fresh for the best results
- milk ~ I used whole milk, but you can experiment with low fat milk, too, or even dairy-free milks like almond milk will work.
- butter ~ I always unsalted butter for baking
- cardamom ~ we made these buns with commercially ground cardamom and freshly ground pods, and I actually preferred the subtle flavor of pre-ground cardamom in this recipe ~ who knew? Can you use cinnamon? Yes, in Sweden that would be a kanelbullar.
- vanilla extract ~ complements and enhances the cardamom flavor just perfectly!

how to shape Swedish cardamom buns
Although they look complicated, once you see the steps laid out, it’s actually not very difficult to make these pretty dough twists. I found that this particular dough recipe is super easy to work with, too. It rolls fluidly, and doesn’t stick.
- First, roll out half of the dough into a rectangle. Spread half the filling over one half of the rectangle
- Fold the other half over, give it a little bit of a roll with the rolling pin to even everything out, and slice the rectangle into 8 equal narrow strips.
- Take each strip and use a pizza cutter or a knife to cut it lengthwise ALMOST all the way through, leaving a little bit still connected at the top.
- Take each “leg” and twist it gently, both in the same direction.
- Then twist the two “legs” around each other.
- Coil the twisted dough into a round shape, tucking the end underneath and pinching it slightly to keep it from unravelling. Each one will be a little different, don’t worry about perfection.

the secret to a soft, shiny surface on your cardamom rolls
I’ve made a lot of different bread and sweet pastry recipes over the years that have called for all kinds of toppings – you can brush your dough with cream or milk, an egg wash, or butter, before baking to help maintain a soft exterior and give them a bit of shine. But this recipe uses a different technique, and I love it!
After the buns have baked, when they are hot from the oven, I brush it with a sweet simple syrup enhanced with a bit of vanilla extract. It makes the buns shiny and the crust soft without making it at all sticky. The bit of extra sweetness plus the vanilla is wonderful.

how to reheat homemade cardamom buns
We found, to our delight, that these rolls reheat beautifully in the microwave, in just 30 seconds, depending on your wattage. They become softer and more fragrant, and just amazing. Of course you can always go the oven route, just cover your buns with foil and reheat in a low (300F) oven.
to freeze cardamom buns
These rolls freeze beautifully after they’ve baked. Just let them cool completely before wrapping individually in plastic, then in foil. You can also pop them in heavy duty zip lock bags for extra protection from freezer burn.

why you need to give these sweet cardamom rolls a try
These rolls blew me away, I’ll definitely be making them again and again. The texture was soft and plush, not crusty and ‘bready’ like some pastry rolls can be. These rolls kept that plush texture even after a couple of days on the counter.
The flavor is wonderfully complex, I think that’s due to the combination of cardamom and vanilla. It lingers on the palate nicely.
Whether you’re an experienced baker or a novice, I highly suggest giving these sweet rolls a try.


Cardamom Buns
Video
Equipment
- stand mixer
- 2 baking sheets
Ingredients
For the dough
- 10 Tbsp unsalted butter
- 2 1/8 cups whole milk
- 2 packages instant yeast (2 packages contain 1/2 oz. or 4 1/2 teaspoons of yeast.)
- 1 tsp salt
- 1/2 cup granulated sugar
- 5 3/4 cup all purpose flour
For the filling
- 10 Tbsp unsalted butter, softened
- 1/2 cup granulated sugar
- 1 1/2 Tbsp ground cardamom
For the glaze
- 1/2 cup granulated sugar
- 1/4 cup water
- 1/2 tsp vanilla extract
Instructions
- In a small saucepan, melt the butter and then add the milk. Warm the mixture until it's lukewarm, and then add it to the bowl of a stand mixer fitted with the dough hook attachment. Note: the milk should not be hot, just barely warm to the touch, or it will kill the yeast.
- Add the yeast to the bowl with the milk and butter mixture, and mix to dissolve. Then add the salt and sugar, and mix together.
- With the mixer running on low speed, slowly add the flour. Once all the flour has been added, continue to knead for about 10 minutes. The dough should be smooth and pulling away from the side of the bowl.

- Cover the bowl (no need to transfer to a separate greased bowl) and allow to rise for 45 minutes to an hour, or until about doubled in size. Note: find a nice warm spot for your dough to rise.

- While the dough is rising, make the cardamom filling by simply mixing all of the filling ingredients together with a fork until uniform. Your butter should be soft enough to mix easily. Set aside.
- Prepare two large baking sheets by covering them with a sheet of parchment paper.
- Once the dough is risen, gently deflate it and divide it in half. Place one half on a lightly floured surface and roll it out into a rectangle about 14 inches wide by 18 inches long. Spread 1/2 of the filling over 1/2 of the rolled out rectangle.

- Fold the half of the dough without any filling over the other half of the dough. Roll out the dough a little bit more to get everything of a fairly even thickness.
- Using a knife or a pizza cutter, divide your folded rectangle, widthwise, into 8 equal strips.

- Take each strip and slice it lengthwise almost all the way in half, leaving a little bit connected at the top.

- Take each "leg" and gently twist it, both in the same direction.

- Next, twist the two "legs" around each other gently.

- Coil your twist into a small circle, tucking the end underneath and pinching it into place so it doesn't come undone. Don't worry about being perfect, just get it all twisted into a 'messy bun'.

- Repeat for the rest of your rectangles, and for the other half of the dough.

- Place your shaped rolls on your prepared baking sheets, spacing them a few inches apart. Cover loosely with a kitchen towel, and allow to rise again for about 1 hour. They may not puff up very dramatically, but should be a bit plumper.

- Towards the end of the rising time, preheat the oven to 425F.
- When the buns are done rising, bake them for 15 minutes.

- Make the glaze by adding the sugar and water to a small saucepan and heating just until the sugar is dissolved. Remove from the heat and stir in the vanilla extract.
- When the buns are done baking, remove them from the oven and brush them with the glaze while still warm. You can add a second coat of the glaze once they have cooled down a bit if you want them to be extra-shiny.

Notes
Nutrition
more Scandinavian inspired recipes


Hi Sue,
Can you tell me the metric weight for both the butter and milk in the dough? Thank you!
Hi Mary Jo, the butter is 141 g and the milk is 518 g.
Great recipe! Made a half recipe and they turned out great, and used whey (we made cheese the other day) instead of milk and it turned out perfect, delightful, soft and just the thing to have with coffee. The metric measurements are a bit weird (115g plus 2 tablespoons when it could be just 140g for example – I’m guessing maybe it’s auto-generated?) but otherwise the instructions were clear! Thank you for sharing the recipe, I’ve bookmarked the recipe to make again sometime!
Hi Alf, yes the metric conversions are auto, I’ll go in and tweak, thanks! Glad you loved these 🙂
Divine. I didn’t have quite enough flour for the recipe so substituted 200g of almond flour and they came out beautifully moist.
sounds delish!
We love this recipe. My kids often ask for “twisty buns”. Is there a way I could freeze half of the recipe to bake at a later date? What step would be best for this?
I would love to make these! Can you please post and overnight method? I’d like to do everything, place in fridge, then bake in the morning.
Can the dough be doubled so that I can make more? Also, what is the final size of the roll? And if we want it to be larger in size what would we need to do? Thank you and I’m so excited!
You should be able to form the rolls and cover in the fridge overnight. I don’t recommend doubling the recipe, I’d suggest making the recipe twice instead. I also don’t recommend increasing the size of these rolls, they might not bake evenly. Good luck and let us know how you do!
I have made this recipe 5 or 6 times since discovering it at Christmas time. Never fails. Love the soft dough and wonderful flaver!
This recipe is my go to when anyone is craving kardamom bullars! Thank you, they come out amazing every time! One question, could I make this dough ahead of time so that I could just bake them in the morning?
Glad you love these Jeanette! I think you should be able to keep them refrigerated overnight and bake in the morning. Let us know how it works for you.
Cooks up BEAUTIFULLY vegan, too! I subbed almond milk and plant-based butter and they were just as tasty. These rolls always come out perfect, and they’re super fun to make. I will often divide the dough in fourths so they buns are smaller and cook them in a glass pie tin. As pretty as they are delish. They’re just the right amount of sweet. Every body loves them from my picky teen to my vegan chef sister in law! Very best right out of the oven, or warmed up in the toaster oven (I like to under bake them a bit for this scenario).
So glad to hear about your vegan version Jen, thanks so much for the review!
My wife and friends loved this!
As enjoyable to make as it is to eat. One aspect is like to improve on for next time is to minimize the burnt sugar on the bottom of the bullar. Any ideas? It seems that my oven runs hot so I may try a lower temp
A slightly lower temp might work. You might also try using a higher rack in the oven, or a thicker, insulated baking sheet. Make sure you line with parchment, too, that helps protect the bottom of the buns.
Hey!! Love the recipe but maybe i’m stupide but at step 7 it says to spread only 1/2 of the filling but what about the other half?? Do i have to repeat the step and fold again? I checked if i would have to use later as glazing but no luck! Sorry, english isn’t my first language so maybe that’s why i’m lost haha
Hi Sarah! In step 7 you’ll divide your dough in half, and then work with the first half. Then in step 14 you’ll repeat the process with the other half of dough (and other half of filling.) Hope this clarifies ~ this is one of my more complicated recipes, for sure!
I have made this recipe twice now and it came out beautifully both times. The second time I doubled it and used my extra dough with a cinnamon roll filling. My kitchen became heaven — thank you for sharing this divine treat. This time my batches will go to colleagues and a dear friend who’s had a family member pass this week. (I can’t think of a more comforting treat, personally.) I had no issues with the instructions, as another reviewer mentioned, but I do try and read them carefully a couple of times before beginning since I have a learning disability.
Thank you, Mel! I love this recipe and I hope they will bring some much-needed comfort to your friend. I also always try to read through recipe instructions a couple of times before trying something new, it’s so helpful.