
Homemade Raincoast Crisps are a copycat version of the famously beautiful and crunchy crackers that dominate cheese boards everywhere, and they’re so easy to make! Everyone who tastes them falls in love.

WANT TO SAVE THIS RECIPE?
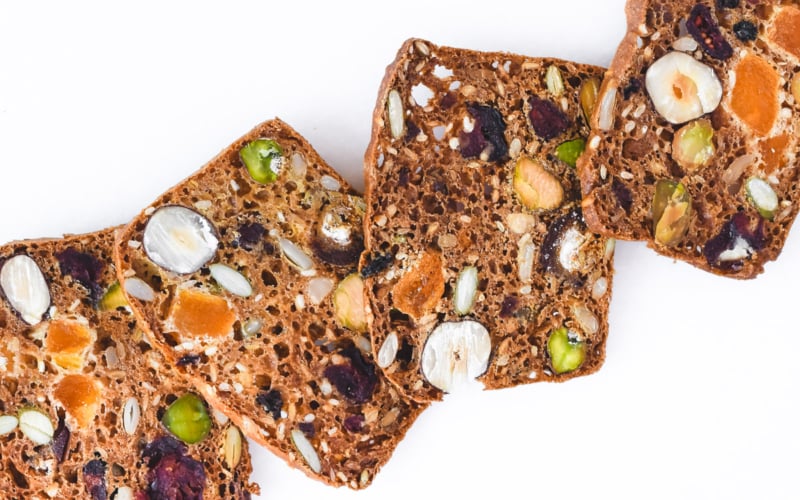
my easy copycat Raincoast crisps recipe makes the perfect cracker!
Raincoast Crisps crackers are famous for their incredibly crunchy texture, their uniquely beautiful look, and all those creative flavors ~ they revolutionized the bland world of crackers, and now you can make them at home! Trust me on this, friends, you need to make these, they’re awesome, easy, and spot-on.
Not all copycat recipes are this spot on, this perfect a replica of the original. But my Raincoast crisp recipe is pretty much identical to those you find in the fancy cracker section of your store, but guess what? Mine are way more affordable, easy to make, and super customizable.
Interestingly, the reason Raincoast Crisps are so easy to replicate in your home kitchen is because they’re made in small batches, using whole ingredients and no preservatives, etc. No fancy ingredients or equipment needed!

why make homemade Raincoast Crisp crackers?
Sure, you could go out and pick up a pack of Raincoast Crisps, but what fun would that be?? And to be honest, as with so many copycat recipes, this one is even better than the originals because you control the ingredients.
- the recipe is super easy and requires no special skills. It works perfectly every time.
- you can customize it to your dietary needs and preferences, or just work with what’s in your pantry!
- these crackers are super healthy, made with no oil or fats, tons of nutritious nuts, seeds, and fruit, and just a touch of honey for sweetness.
- Depending on how thick your slices are, you’ll get anywhere from 20 to 30+ crackers out of every mini loaf. That means this easy recipe will yield upwards of 100 crackers! Not bad for a batter you can whip up in minutes with just a bowl and a spoon.

how to make copycat Raincoast Crisps
The process for making super crispy crackers is much like making biscotti ~ the batter is baked in a loaf pan, or in this case, mini loaf pans, then sliced, and baked again. It’s that double baking that results in the deep color and supremely crunchy texture.

1. Stir your batter together in a mixing bowl
Toss all the dry ingredients together to mix, then stir in the buttermilk and honey. (The batter will be thin.)

2. Divide batter between 4 mini loaf pans
Bake until golden and a toothpick comes out clean.

3. Let cool and then freeze the loaves for at least 2 hours
The freezing firms up the loaves so you can slice them very thinly.

4. Slice each loaf very thinly and bake again
The second bake, at a slightly lower temperature, crisps and browns the crackers to perfection. They’re ready to enjoy!

copycat Raincoast Crisps cracker FAQS
Freezing the loaves really does facilitate the slicing process. But you’ll also need a good sharp, serrated knife. A good quality bread knife is ideal. You can also use a mandoline, but I don’t recommend this unless you’re very skilled. If you use protective gear and proceed safely, you can get perfectly even, thin slices this way.
For sure. These crackers are low calorie and full of fiber, with no added fat and lots of nutritious fruits, nuts, and seeds.
Yes, they’ll freeze nicely. Put them in heavy duty freezer bags or freezer safe containers and use within 3 months.
Absolutely. Add a bit more seeds, or dried fruit instead.
They’ll keep quite a long time because they are so crisp. They will keep several weeks, but they never last that long!
I used 4 USA mini loaf pans, they each measure 5.25×3 inches. Many different sizes of loaf pan will work, you will just have to adjust the initial baking time accordingly. Mini loaves like mine make the best size for the crackers, just like the ones in the stores.
Yes, you can play around with different flours in different proportions. I do recommend making the recipe as written, first, before you try to adjust it.
I haven’t tried that but I don’t see why not. You might try almond, soy, or coconut milk.
Try molasses, agave or maple syrup. I haven’t experimented with alternative sweeteners yet. This little bit of sweetener brings out the flavors without making the crackers taste at all sweet.

how to serve these crisp crackers
These gutsy crackers can take anything your charcuterie platter can throw at them, and they pair well with just about any cheese you can think of, from soft gooey Brie to an aged cheddar and more. They’re strong enough to hold up to anything, and always provide that famous crunch! The crackers are so tasty a lot of folks, including my daughter, just love to eat them solo, as a delicious and healthy snack.
we love seeds!
- Multi Seed Crisps ~ Homemade Vegan Crackers
- How to Roast Squash Seeds ~ five ways!
- Lemon Poppy Seed Salad Dressing
- Toasted Muesli
- Dark Chocolate Mendiants
- 7 Ways to Use Pumpkin Seeds!
- Why we love lemon poppy seed everything!
- Paleo Fruit and Nut Bread

Copycat Raincoast Crisps Crackers
Video
Equipment
- 4 mini loaf pans See mine here
Ingredients
dry ingredients
- 1 cup whole wheat flour
- 1 cup bread flour
- 1/2 tsp salt
- 2 tsp baking soda
- 1/4 cup golden flax seeds
- 1/4 cup pepitas
- 1/4 cup sesame seeds
- 1/4 cup sunflower seed kernels
- 1 cup assorted dried fruit (I used chopped apricots, dates, cranberries, currants.)
- 1 cup assorted nuts (I used whole hazelnuts, whole pistachios, whole almonds.)
wet ingredients
- 2 cups buttermilk
- 1/4 cup honey
Instructions
- Preheat oven to 350F. Lightly butter or spray 4 mini loaf pans.

- Toss the dry ingredients together in a large mixing bowl.
- Add the buttermilk and honey to the bowl and stir until everything is well combined. Note: the batter will be thin.
- Fill your 4 loaf pans evenly. Bake for about 30 minutes, or until golden on top and a toothpick inserted in the center comes out without wet batter clinging to it.
- Let cool briefly in the pans before turning out onto a rack to cool completely.
- Wrap the completely cooled loaves in plastic or foil and put in the freezer for at least 2 hours, or until nice and firm. Note: it's important that the loaves be completely cool before you put them in the freezer.
- Preheat the oven to 300F.
- Slice the partially frozen loaves as thinly as you can. You should get anywhere from 20-30 slices from each loaf.
- Put the slices in a single layer on a dry baking sheet (you can fit them closely together) and bake for 15 minutes on one side, then flip for another 15 minutes. Note: depending on the thickness of your crackers they could take a little more or a little less time. Watch carefully so that they don't burn.


Notes
- If using larger dried fruits like apricots or figs, be sure to cut them in smaller pieces.
- If you don’t have buttermilk you can make a substitute using whole milk and a tablespoon of lemon juice. Mix them together and let sit on the counter for 15 minutes before using.
other ingredients to use:
- fresh or dried herbs
- grated aged cheeses
- different whole grain flours like buckwheat or rye
- rolled oats
Nutrition


I love the idea of making crackers. Can I substitute all-purpose flour and rye flour instead of bread flour and whole wheat or only all-purpose flour?
Yes to all. You can use any combo of those flours.
I made them for the first time tonight and they came out great! I bought a mandolin just for these and used it to cut them thinly. I followed your recipe exactly – no modifications. Excellent recipe. I’m serving them to guests Friday, three days from now. Is it okay if I keep them in a zip lock baggie on the counter til then?
Yes, or sometimes I’ll just leave them uncovered on the counter.
I want to try this recipe but have question: Could I use 2 cups of bread flour instead of the 1 cup of whole wheat flour?
Yes, that will work fine.
I love this recipe. I baked it in regular loaf pans and when cool, I sliced the loaves lengthwise into two halves.
Then put in the freezer and baked again as per the recipe. Worked perfectly! Right size for me and tasted amazing!
I have 2 questions. I have a grain mill. Can I use freshly milled whole wheat flour? I was wondering how much fresh herbs you would use. I was thinking of using rosemary.
You should be able to use your grain mill, no problem. And if you want to add herbs, I suggest using dried herbs, you can use them to taste. Start with a teaspoon.
I used the air fryer (preheated to 300 degrees, crisped at 300 degrees for 12 minutes. Perfect!!!
Have you ever baked these in an air fryer?
These are really good! I’m trying to recreate strawberry jalapeno crackers that i had when i was on holiday in America and i think this is a good base. I made half the batch as directed and half attempting with strawberry and jalapeno. The half as directed was very good. With the experimental half, I only had less than half a cup of dried strawberries so I supplemented it with raisins and cranberries, i think more strawberries would have been better. I used half a green chilli pepper which provided a little heat but not enough, so next time i will either use a full pepper per half batch or switch some of the honey for hot honey. Thanks for the recipe
I love the idea of strawberry jalapeño crackers!