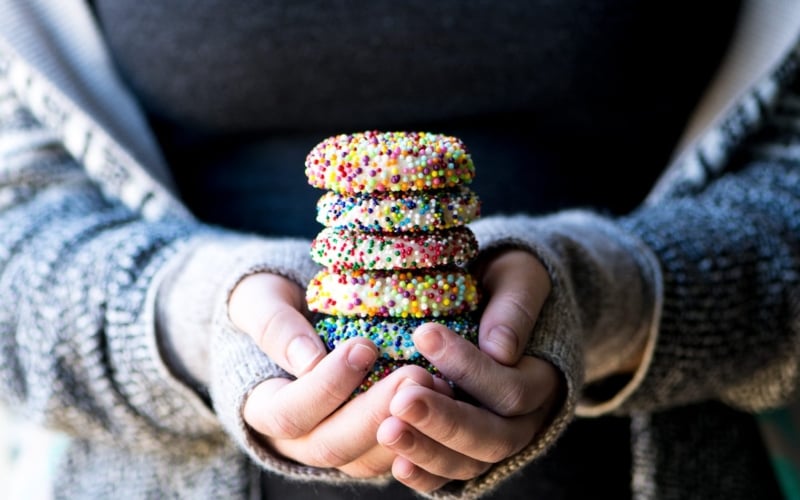
Sprinkle Sugar Cookies are soft buttery drop cookies bedazzled with all the colors of the rainbow ~ customize these easy cookies for your favorite holiday!

I always get the baking urge in January after the holiday crush is over and I have time to enjoy it. These cookies probably should have made it into the Christmas lineup last month, but I figure a great sugar cookie is like a little black dress, it’s never out of place. Accessorize with pink or blue for baby showers, team colors for game day snacks, gorgeous crimson for Valentine’s Day, metallic for an anniversary bash, pastels for Easter…you get the idea.

When it comes to sprinkles I’m a kid at heart. I can’t resist them, I love the colors, the shapes, the crunch… and there aren’t too many desserts that a layer of sprinkles won’t improve. Actual kids love them, too, and love to help make them, so if you’ve got bored housebound little ones hanging around on a snow day, whip up this quick sugar cookie dough and let them take it from there.
The dough comes together like magic in a food processor, no need for extra bowls or mess. You can see it has a beautiful velvety texture in the photo below. Just make sure your egg, butter, and cream cheese are at room temperature. There’s no need to chill it before baking, either. Love that.

Once you’ve rolled your balls of dough in the sprinkles and got them completely covered, you’ll press down gently to flatten them a bit. They bake up into the perfect shape, slightly crunchy on the outside and soft on the inside.


These sugar cookies are just the excuse I need to out my sprinkle stash, I keep all the little bottles in a giant ziplock freezer bag so I can tote them around easily. Sprinkles last forever, so I’ve collected quite an assortment.
types of sprinkles for sugar cookies:
- Nonpareils ~ these are the itty bitty little round ones, and they’re the most historic of the bunch, dating back to the 1800s. They’re the messiest, too, and have a tendency to fly everywhere.
- Sprinkles ~ (Jimmies, hundreds of thousands) these are the classic long shapes and my favorites. I’ll show you how to make them yourself, in this post: HOW TO MAKE HOMEMADE SPRINKLES.
- Dragées and pearls ~ larger balls with a hard coating, often in metallic colors. While these are pretty, I find them less appealing to eat.
- Confetti ~ (Quinns) these are the little matte finish disks. They come in other shapes, too.
- Multi-shapes ~ nowadays you can get sprinkles in just about any shape you can imagine, from stars and hearts to little holly leaves, shamrocks, and snowflakes.
- Edible glitter ~ super glitzy shimmer, and comes in lots of colors.
- Colored sugar ~ all types, from superfine to large crystal. You can make your own colored sugar, it’s a fun diy project.
*You can also get all natural sprinkles, which are colored with vegetable dyes and are beautiful too, in a more subtle way.

I’m definitely a go big or go home type when it comes to sprinkles, and I like to pile them on, but getting those little guys to stick can be a challenge! When cookies bake, they expand, and the sprinkles spread out leaving gaps. Here are a few tips for getting that fully sprinkled look that everybody loves…
How to get sprinkles to stick to sugar cookies
Here are a few tips for achieving that perfectly sprinkled sugar cookie:
- Put the sprinkles in a small dish deep enough to cover the ball of dough. The deeper the sprinkles, the easier it is to fully coat the dough.
- Work with one cookie at a time, the warmth of your hands will soften the dough and allow the sprinkles to adhere better.
- Push the ball of dough lightly but firmly against the sprinkles to encourage them to thickly coat the surface.
- After flattening the cookies, add additional sprinkles to the top. As the cookie bakes and spreads, they will fill in gaps.
sprinkle sugar cookies make great gifts
These sprinkle sugar cookies are great for gifting because they’re nice and sturdy (and pretty!) Just let them cool completely and then you can package in cellophane bags or decorative boxes.


Sprinkle Sugar Cookies
Video
Equipment
- medium cookie scoop (2 tablespoon size) optional
- food processor optional
Ingredients
- 3 cups all-purpose flour
- 1 tsp baking powder
- 1/4 tsp baking soda
- 3/4 tsp salt
- 1 cup unsalted butter at room temperature, cut in pieces.
- 1 1/4 cups sugar
- 1/4 cup cream cheese
- 2 tsp vanilla extract
- 1/2 tsp almond extract
- 1 large egg at room temperature.
Instructions
- Preheat oven to 375°F
- Put the first 4 ingredients in a food processor and pulse to combine. Note: I use a food processor but you can use a stand mixer or electric beaters if you prefer.
- Add the butter, sugar, and cream cheese, and pulse until the butter is well incorporated.
- Add the egg and extracts and process until the dough comes together in a lump.
- Scoop dough out with a medium (2 tablespoon) cookie scoop and roll into a ball with your hands. Roll the balls of dough in sprinkles, making sure to get them completely coated.
- Place the balls of dough on a cookie sheet, 2 inches apart. Press down on each ball with the back of a drinking glass to flatten slightly. Bake for 8 minutes. Let them cool for a minute or two on the cookie sheet and then transfer to a rack to cool completely.
Notes
Nutrition
Make it your own ~
- I’m going to make a chocolate version of these next, I will probably try substituting about 1/4 cup of the flour with an equal amount of unsweetened cocoa powder.
Don’t forget to pin these easy Sprinkle Sugar Cookies!


Love your sprinkles! Now let’s talk about your fingerless gloves…!
I’m a closet fashion blogger Laura 😉
Just the prettiest cookies ever! Loving the idea of a chocolate version too 🙂
How fun these are! I love that the dough is made in the food processor! You are right, the dough looks so creamy and silky!!
Honestly Beth the food processor makes these so easy and mess free, it’s the best part!
These cookies are so pretty with all these different sprinkles, pinned it!
Thanks Patty!
Gorgeous photos and never knew there were so many different types of sprinkles! WOW!
a sugar cookie always makes a good dessert! I love that these are super customizable with the sprinkles too. I could definitely switch up the colors and types to go with different events
Thanks for all the tips on getting the sprinkles to stick. I am imagining these colored for Valentines, Mardi Gras (wouldn’t that be fun?!), St. Patty’s….and on!
These are perfect for Mardi Gras, I hadn’t thought of that Leslie 🙂
Aww these are so beautiful! Love the puffy cookies and all those happy sprinkles. They are perfect for any occasion or just because I’ve made it two weeks without a cookie!
Haha, going two weeks without a cookie is the perfect excuse to try one of these, Tricia.
Adorable! I’m a sprinkle fanatic too and have shoe boxes full of them in my pantry. I think it’s time to have a cookie party! Just looking at your pretty cookies makes me want to celebrate!
We should have a sprinkle fest, Chris 🙂
Simple yet awesome with all the colourful sprinkles!