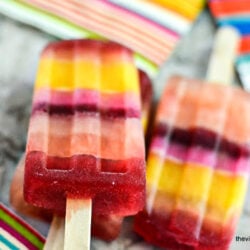
Striped Juice Pops might just be summer’s prettiest and healthiest frozen treat — I’ll show you how to create these refreshing layered popsicles in a few simple steps!

I’ve always adored stripes, they’re so beautiful and summery ~ think striped beach towels and umbrellas! Colorful stripes just seem like a natural for popsicles, too. The possibilities are endless, limited only by the number of different fruit juices you can fit in your fridge. Everybody will be wowed by the pretty stripes, but these healthy juice popsicles couldn’t be easier to make. Perfect for kids, grandkids, or anybody trying to stay healthy and hydrated this summer.

I used a variety of different juices for my pops, including bottled, canned and fresh squeezed. There’s really no right or wrong way to do this. You could pick two colors and alternate them, or go to town and do multi-colored stripes like I did. Measure as you go for precise stripes, or go for a random, organic look. That’s my fave. Every juice popsicle is a unique surprise as you pull it out of the mold.

what you’ll need to make striped juice popsicles
- Assorted fruit juices, ideally in bright contrasting colors
- a popsicle mold
- popsicle molds come in all shapes and sizes, but I love the classic shape of this one.
- popsicles sticks
- Some will come with your mold, but you’re gonna need more. You can find them in stores like Target and Walmart, or online, here.
- a 2-4 cup measuring cup with spout for filling your popsicle molds

classic popsicle mold
I’ve used the same classic shaped popsicle mold for years. It’s inexpensive, easy to clean and lasts. You’ll get many years of fabulous homemade popsicles out of it, promise.

types of juice to use
All natural sugar free fruit juices are ideal, and the healthiest choice:
- pineapple
- pink grapefruit
- cranberry
- orange
- pomegranate
- grape
- cherry
That vivid pink stripe is a splash of Snapple because I couldn’t resist that shade. Experiment! You’ll get a new blend of bright fruit flavors with every lick. Your kids and their friends will think you’re a genius.

This is more of a method than a recipe…feel free to have fun and experiment with different designs and above all, have fun!

Tips for making striped juice popsicles
- Basically, if it’s liquid you can make it into a popsicle. That goes for most everything except alcohol, which freezes at a lower temperature and so you can only use about 20% in your ‘poptails.’
- You can use pureed fruit, or ready made juices in your popsicles. Hint: juice makes the whole project much quicker.
- Natural juices will produce subtle stripes, and if you’re going for bright colors, artificially colored drinks like Kool Aid, Gatorade, and Snapple are perfect.
- For clearly defined striped make sure each layer is frozen solid before you add the next. And have all your juices chilled to begin with.
- For more of a tie-dye effect, don’t freeze each stripe quite as long before you add the next, they will blend into each other a bit that way.
- Juice popsicles are best enjoyed the same day they’re made, but if you need to save one or two, wrap in waxed paper and then pop in a zippered freezer bag and store in the freezer.

Summer Striped Popsicles
Equipment
- standard 10 count plastic popsicle mold
Ingredients
- 5 cups assorted fruit juices: you can use fresh, frozen, canned, or bottled.
Instructions
- It helps if your juices are cold to begin with. Start by putting a small amount of one juice in the bottom of each of your popsicle molds. You can do a thick or a thin layer, or some of each, it’s up to you. Put the mold in the freezer and freeze until firm, about 30 minutes.
- Take a different juice for each subsequent layer. Pour the layer and then freeze again until solid.
- When you are about 1/3 of the way filled, take the frozen mold out of the freezer and insert the stick. I make a little incision in the ice with a small sharp knife dipped in boiling water. Make a slit just big enough to insert your stick so it won’t tip. Once you have all your sticks in place, add another layer, and keep going as above, until the popsicle mold is full.
- To unmold your pops, briefly dip the mold in a sink of hot water, just up to, but not over the top. Pull out the pops. If they don’t wiggle out easily, dip the mold again for a few more seconds.
- To store your pops, wrap them in waxed paper.
Nutrition
more popsicle recipes to try


I live in Florida so it’s always warm enough to make popsicles which is part of the reason finding new and fun popsicles is so amazing! Truley a delight, I can’t wait to try it!!!
I’m here in Los Angeles and the same is pretty much true for us, too. Hope you have fun with these!