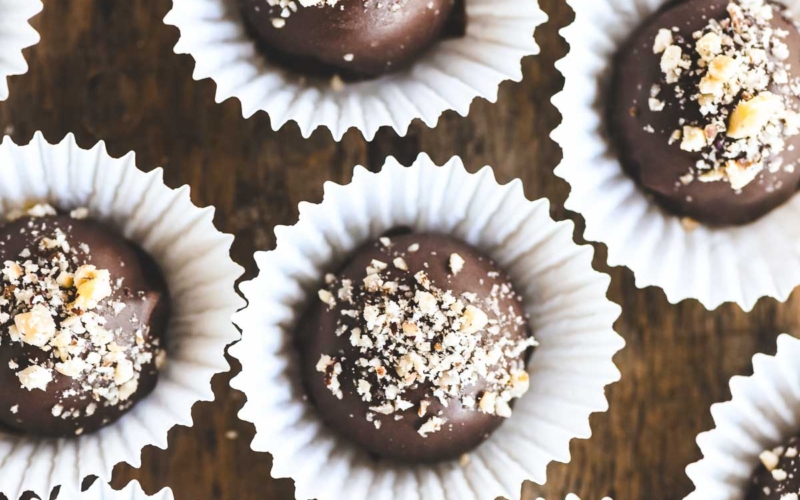


Chocolate hazelnut truffles are made with my homemade Nutella and coated with milk chocolate and sprinkled with crushed toasted hazelnuts. They’re melt-in-your-mouth irresistible!

WANT TO SAVE THIS RECIPE?
This chocolate hazelnut truffles recipe was the logical extension of my homemade Nutella recipe. I noticed that my chocolate hazelnut spread happens to get firm and truffle-like when you store it in the fridge, soooo…..the obvious next step was try to make truffles with it. The result is splurge-alicious, holiday-worthy and giftable to the max. And you don’t have to be a skilled candy maker to do it. Just scoop out the chocolate hazelnut ganache, dip in melted milk chocolate, and dust with crushed hazelnuts. Done and delicious!

what you’ll need to make chocolate hazelnut truffles
The filling for these truffles is my homemade chocolate hazelnut spread.
- raw hazelnuts
- confectioners sugar
- cocoa powder
- vanilla
- vegetable oil
- milk chocolate melting wafers
- Melting wafers are specifically formulated to melt smoothly and evenly. Mine are from Ghirardelli because I know the quality. You should be able to find them in your regular larger grocery stores in the baking chocolate section.
- butter
- a little bit of butter added to the melted chocolate loosens it up and gives it a gloss.
- toasted crushed hazelnuts

How to make chocolate hazelnut truffles
- Make homemade chocolate hazelnut spread and refrigerate overnight.
- Use a small 1″ scoop to portion out balls and place on a parchment lined plate.
- Freeze the balls for at least 30 minutes. This is important to keep the truffles from melting in the warm chocolate coating.
- Melt the milk chocolate wafers and the butter in a small bowl. Let cool briefly so it’s not too hot.
- Dip the cold chocolate hazelnut balls into the chocolate and place on parchment paper. (f your melted chocolate thickens too much over time, reheat briefly in the microwave to loosen it.)
- Immediately dust each truffle with crushed hazelnuts while the coating is wet.
- Let firm up at room temperature before storing in the refrigerator.
- Keep chilled and serve chilled for best texture.

chocolate hazelnut truffles faqs
Can I make these truffles with store-bought Nutella?
- Yes you can, but it’s a little bit more finicky to work with. You will need to refrigerate your Nutella until it is firm enough to neatly scoop first. You will also have to take special care to freeze your scoops before dipping in your chocolate coating so it doesn’t melt.
Can these be made with a different nut?
- Yes, you might use pecans or almonds.
Why do you use melting wafers instead of chocolate to coat these truffles?
- Melting wafers are specifically formulated to melt smoothly and evenly.
- They contain stabilizers and fats, such as vegetable oil, that allow them to set quickly with a glossy, firm finish without tempering to give your truffles a more durable, professional coating.
- They solve a lot of the issues people have when making coated truffles at home. I choose Ghirardelli wafers which are high quality and have really great chocolate flavor. It’s a win win when it comes to homemade candies like these chocolate hazelnut truffles.
Can I coat these truffles with cocoa powder instead of the chocolate coating?
- Yes, but remember these truffles have a soft texture. I think it would be better to coat them with finely crushed toasted hazelnuts instead of cocoa powder, this would give them more structure.

More homemade candy recipes (no bake!)
- Grandma Kathy’s Homemade Turtle Candy Recipe
- Christmas Cracker Candy
- Peanut Butter Truffles
- How to Make Chocolate Truffles
- Amish White Cashew Clusters
- Peppermint Bark Pretzels
- Candied Orange Peel
- White Toasted Almond Bark

the bottom line
I don’t think I need to tell you savvy readers the obvious ~ these chocolate hazelnut truffles are…incredible. Yes, it’s a little bit of an effort to make the filling and chill it before dipping the truffles, but like so many delicious homemade candies, the effort is worthwhile. They have a more nuanced flavor than plain chocolate truffles and they’re just the thing when you want to make a dessert that’s guaranteed to impress. Package them up in small boxes for holiday gifting!

Chocolate Hazelnut Truffles
Equipment
- high speed blender like Vitamix or food processor
Ingredients
chocolate hazelnut filling
- 2 cups roasted hazelnuts, skins removed*
- 1/4 cup confectioner’s sugar
- 3 Tbsp cocoa powder
- 1 Tbsp vanilla extract
- 4 Tbsp vegetable oil, I used almond oil
- 1 cup milk chocolate melting wafers, melted, I use Ghirardelli
truffle coating
- 16 ounces milk chocolate melting wafers, I use Ghirardelli
- 1 Tbsp butter
- 1/4 cup roasted hazelnuts, crushed
Instructions
make the chocolate hazelnut spread (make a day ahead)
- Put the roasted skinned nuts in a high speed blender. Note: you can do this in a food processor, but the resulting texture will be a little rougher and slightly gritty.
- Process the nuts until you get a smooth hazelnut butter. It might take 5 minutes, give or take, until you have a smooth paste. Stop the machine to scrape down the sides several times. Note: the butter will go through a grainy paste stage, then it will get smoother, and finally it will break down further to a shiny, almost liquid stage.
- Add in the rest of the ingredients and process again until smooth and very silky, scraping down the sides of the blender as necessary. Each time you stop and start the machine be sure to start on a low setting, and then gradually increase speed. Check periodically to see if the homemade Nutella is smooth enough for your liking.
- Transfer the spread to a clean jar and let cool at room temperature. Then cap and refrigerate overnight.
make the truffles
- Once the spread is chilled, use a small scoop to portion out balls and place on a lined plate or tray. I use a small 1" scoop that holds a little over a teaspoon. Put the tray in the freezer for 30 minutes.
- For the chocolate coating I do it in 2 batches ~ this keeps the dipping chocolate fresher and makes it easier to dip all the truffles. Divide the chocolate wafers between 2 small microwave safe bowls. Divide the butter between the two bowls.
- Start with just one of the bowls. Microwave on high for one minute. Remove the bowl and stir to melt completely. Set aside to cool for a few minutes.
- Remove half of the truffles from the freezer. Dip each one into the chocolate to cover completely, and then set on a lined plate or tray. Immediately dust each truffle with the crushed hazelnuts while the chocolate is wet. Let the truffles set up at room temperature and then transfer them to the refrigerator, where they will be stored until ready to enjoy.
- Repeat this procedure with the rest of the truffles.
- Keep the truffles refrigerated, they will last about 2 weeks. They can also be frozen for up to 3 months.
Notes
- To remove the skins put the nuts on a clean kitchen towel. Fold the towel over the nuts and rub off the skins with a back and forth motion. (They don’t have to be completely bare, a little skin is fine)
- Maillard Reaction: roasting nuts brings out their natural oils and triggers the Maillard reaction, a chemical reaction between amino acids and reducing sugars that enhances the nuts’ flavor, giving them a richer, deeper taste.
- Oil release: roasting helps release the natural oils within the nuts, making them easier to grind into a smooth, creamy consistency. This results in a nut butter that is less grainy and more spreadable.
- Softened structure: roasting softens the nut’s structure, making them easier to blend, which can reduce the wear and tear on your food processor or blender.


These were amazing, I’m giving them as gifts this year!
Why do you use melting wafers instead of real chocolate without all of the additives?
I’ve discovered Ghirardelli melting wafers, and I like them because the flavor is great, and there is no need to temper the chocolate, so it makes a hard glossy surface on the candies. I think the result is worth it for the occasional times you are making homemade candy and want a professional result. You can definitely use real chocolate, and the only issue is that if it’s not tempered (a pretty fussy process) the chocolate can come out dull, soft, or develop bloom marks (white spots or streaks.)