
These homemade Tagalong Girl Scout cookies are even more delicious than the originals…no green uniform required!

WANT TO SAVE THIS RECIPE?
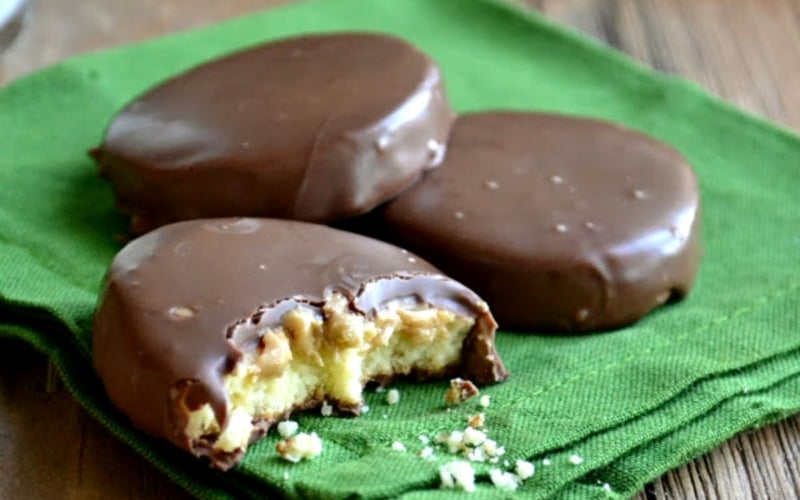
copy cat Tagalong Girl Scout cookies
Yes, it is possible to be too virtuous. Here’s how it all went down— I didn’t intend to, but I bought a few boxes of girl scout cookies from the little girl that came to our door last month. She delivered them the other day. 3 boxes of Tagalongs, my favorite. But I was so good I stashed them inside a flat rate box that was just about filled and ready to be shipped to my daughter at grad school. I even taped the box shut.
So of course the next thing I know I’m going crazy looking for a little something sweet after dinner. On a whim I typed in DIY Tagalong Cookie in my Google search bar and it was straight downhill from there. Or uphill. Depends on your point of view I guess.

Tagalongs are my favorite Girl Scout Cookie.
I don’t know if I’m in the minority on that or what. I like them much better than all the others. Tagalongs have a shortbread cookie base, a layer of sweetened peanut butter filling, and a coating of milk chocolate. They’re richer than the other Girl Scout cookies, and that peanut butter chocolate thing is always good.

what you’ll need to make copy cat Tagalongs
for the shortbread cookies
- all purpose flour
- confectioner’s sugar
- egg
- butter
- baking powder
- salt
- vanilla extract
for the filling
- peanut butter
- smooth pb works best, and make sure it’s not ‘natural’ peanut butter (the kind that separates into an oily layer.) My preferred brand is Jiff.
- confectioner’s sugar
for the coating
- milk chocolate
- I used milk chocolate chips for my coating. I should have used baking chocolate, but I didn’t have any. The chocolate chips will work, but I find they melt up a little thicker, and so it is a little more tedious to dip the cookies. I would recommend using baking chocolate.

My homemade Thin Mints have been so popular, and they turned out great, but I have to say, these Tagalong cookies are even more my style. I guess I’m slowly working my way through the Girl Scout lineup…anybody have a good recipe for Samoas?


more Girl Scout inspired recipes
- Thin Mint Cookies
- Gluten Free Thin Mint Cookies
- No Bake Vegan Thin Mint Cookies
- Easy No Bake White Chocolate Thin Mints
- Lazy No Bake Thin Mint Cookies


Tagalong Girl Scout Cookies
Ingredients
for the cookies
- 1 large egg
- 1/2 tsp vanilla extract
- 1 3/4 cups all-purpose flour
- 3/4 cup powdered sugar
- 1/4 teaspoon salt
- 1/2 teaspoon baking powder
- 1/2 cup unsalted butter, chilled and cut into pieces
for the peanut butter filling
- 1/2 cup smooth peanut butter
- 2 Tbsp powdered sugar
- 1/2 tsp vanilla extract
for the chocolate coating
- 16 oz milk chocolate, cut into small pieces
Instructions
for the cookies
- Preheat your oven to 375F
- Whisk the egg and vanilla in a small cup and set aside.
- Pulse the dry ingredients in the bowl of a food processor to combine. Drop in the pieces of butter and pulse until the butter is incorporated and the mixture is crumbly.
- Pour in the egg mixture and pulse again, about 25 or 30 times, until the dough comes together.
- Turn out the dough onto a floured surface and bring it together in a ball. Divide in 2. Roll out each half into a log about 1 1/2 inches in diameter. The log will be approximately 6 inches or so long.
- Roll the logs in plastic wrap, and refrigerate for about an hour. I like to put my dough logs inside a split cardboard tube (like the kind that wrapping paper comes on) so that the log stays nice and round. If you don’t have one, try turning and reshaping your dough halfway through the chilling time.
- Slice the chilled logs of dough into 1/8 inch slices, and place them 1 inch apart on ungreased cookie sheets.
- Bake at 375 for about 8 to 10 minutes, until just golden around the edges. Cool on a rack.
for the peanut butter filling
- Mix the peanut butter, the sugar and the vanilla. Spread an even layer of the filling on each cooled cookie.
for the chocolate coating
- Put the chocolate into a 2 cup Pyrex measuring cup, and microwave for 1 minute. Take out and stir. If the chocolate is not completely melted, microwave for another 30 seconds. Stir until completely melted and smooth. Make sure you measuring cup is completely dry, even a drop of water will cause your chocolate to seize up.
- Take a cookie and spread chocolate across the bottom. A small offset spatula works well for this. Then place the cookie on a fork, and spoon the melted chocolate all over the top, being sure to cover the whole top. Tap the fork along the edge of the bowl to remove the excess chocolate from the cookie. Carefully lay the cookie on waxed or parchment paper.
- If your chocolate becomes too thick to work with, microwave it for 15 to 30 seconds to-re warm it.
- Let all the cookies set for 30-45 minutes or so until the chocolate firms up. Store in the refrigerator in an airtight container until ready to eat.


Can I substitute store bought shortbread cookies?
Great idea!
Thank you Sue! Hopefully they’ll turn out as good as made from scratch 🙂
I think they’ll be great, just look for a cookie that isn’t too thick!
These look so yummy, and I will have to make them for my husband since Tagalongs are his favorite too. I’ve been using the Ghiradelli Melting Wafers (dark and white) to make homemade Twix Bites, which are absolutely incredible. Have you tried them yet? I bet the cookies would be amazing with these wafers!
I had no idea Ghirardelli made melting wafers, and they would be the perfect solution to any melting and coating troubles, I’m going to check them out, thanks Rachel!
Thanks for the recipe! My dog is named Ghirardelli because she’s so sweet! I’m going to try this recipe with their dark chocolate squares. I love dark chocolate – milk is too sweet for me.
I think this is the perfect sweet to prepare for my husband. He is mad about everything containing peanut butter. Do you think I can put more of the PB cream or it will be difficult to dip in the chocolate later?
I think you can put more on, I think that would be really good, too!
They look divine. Does anyone have a DIY for the lemon pastry crèmes? I cried when girl scouts discontinued those cookies.
We still sell Lemonades down here in Florida. Shortbread with a lemon icing on the bottom. And then the Caramel Delites. Too, too many yummy cookies! Send me an email in January when we will be getting ready to sell hem again, and I’ll hook you up. sassys1313@yahoo.com
HOMEMADE SAMOAS
STEP ONE: THE COOKIES
1 cup butter, softened
1/2 cup sugar
2 cups flour
1/4 tsp. baking powder
1/2 tsp. salt
1/2 tsp. vanilla extract
up to 2 tablespoons milk
Preheat oven to 350F. Line a cookie sheet with parchment or nonstick foil.
Cream butter and sugar. Add flour, baking powder and salt. Add vanilla and milk. Only add a little milk at a time just to help dough come together. U don’t want to add too much and make it sticky. Roll dough 1/4″ thick and cut out circles. (NO cookie cutter? just use a glass upside down) Then u will want a smaller cutter for the center. If u don’t have one, try using a straw or skip this part because the filling covers a lot of the center anyway! Bake 12-14 minutes or until lightly golden brown. Cool completely.
STEP 2: DIP THE COOLED COOKIES
MELT 1 BAG CHOCOLATE CHIPS (DARK, SEMI OR MILK) AND DIP EACH COOKIE INTO THE CHOCOLATE. SET ON WAX PAPER. YOU CAN DIP JUST BOTTOMS IF U PREFER BUT I DIPPED ENTIRE COOKIE.
STEP 3: MAKE THE TOPPING AND PLACE ON COOKIES WHILE CHOCOLATE IS STILL WET.
3 cups shredded sweetened coconut
12 oz. caramels
1/4 teaspoon salt
3 tablespoons cream
Preheat oven to 300 degrees and spread coconut on a baking sheet. Bake it and toss often until lightly toasted and golden -about 15-20 minutes. Cool on baking sheet, stirring occasionally. Set aside.
Place caramels, salt and cream in microwave safe cup and nuke until melted and smooth about 3mins. When smooth, stir in the toasted coconut.
Using a small spoon or spatula, spread the topping on cookies. Use any extra chocolate to drizzle across the top! Then u can set in fridge to speed the process of everything firming up.
I’m on it!!
how perfect, sue–i’m impressed! tagalongs were always my favorite girl scout cookie, no lie.
Am I in error in maintaining that it’s almost un-American to eat Tagalongs without chilling them in the freezer for a bit, until they are almost (or even completely) frozen?
You’re absolutely right 🙂
These look unbelievably good. Too dangerous to have these in my pantry.
How about in the freezer? That’s where mine are!