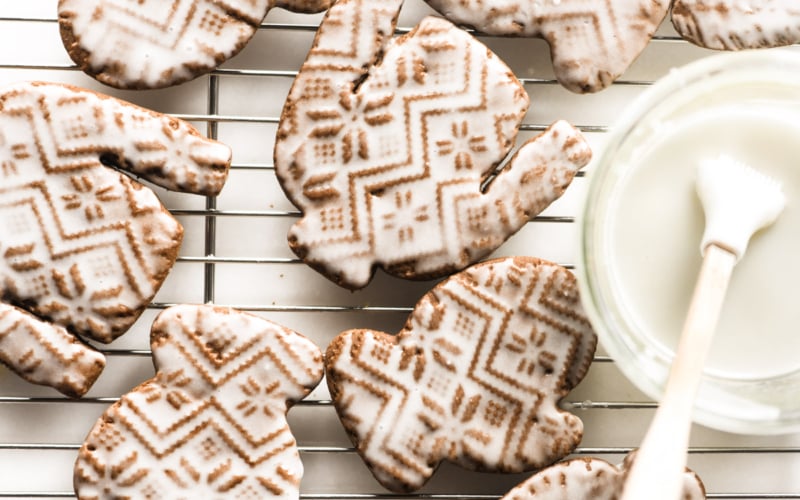

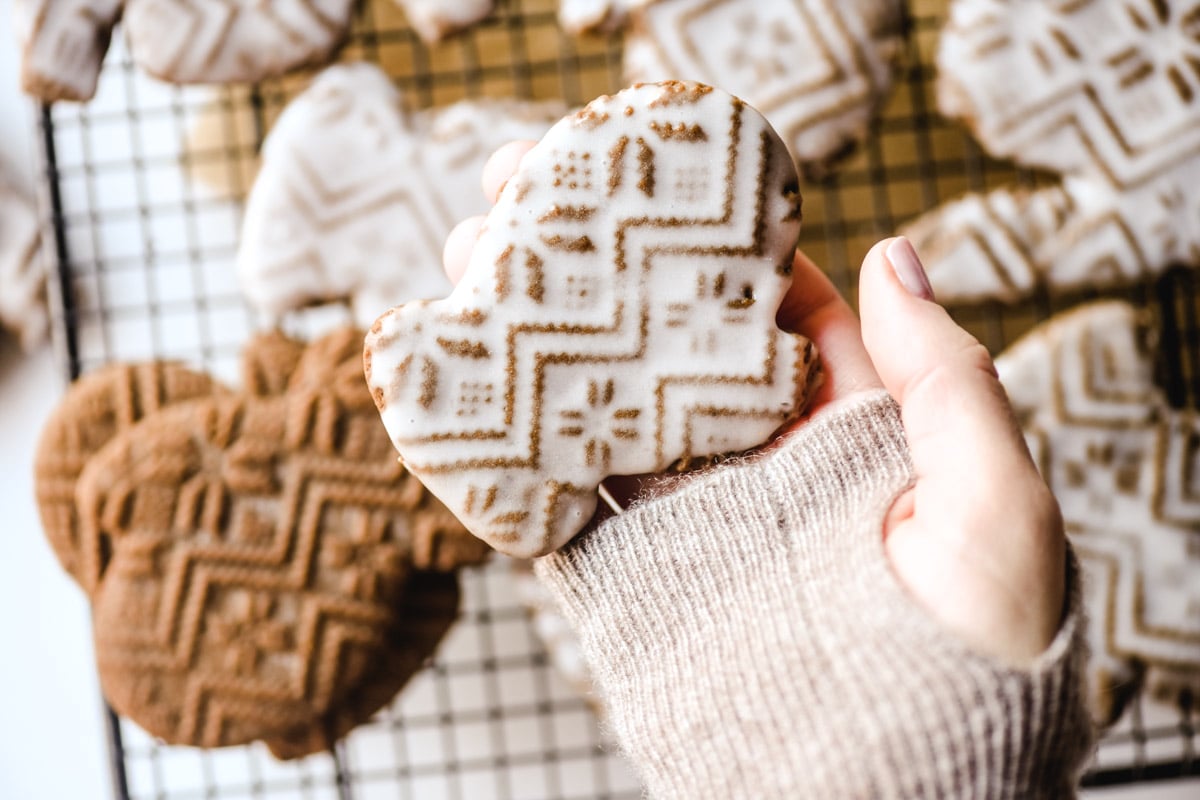
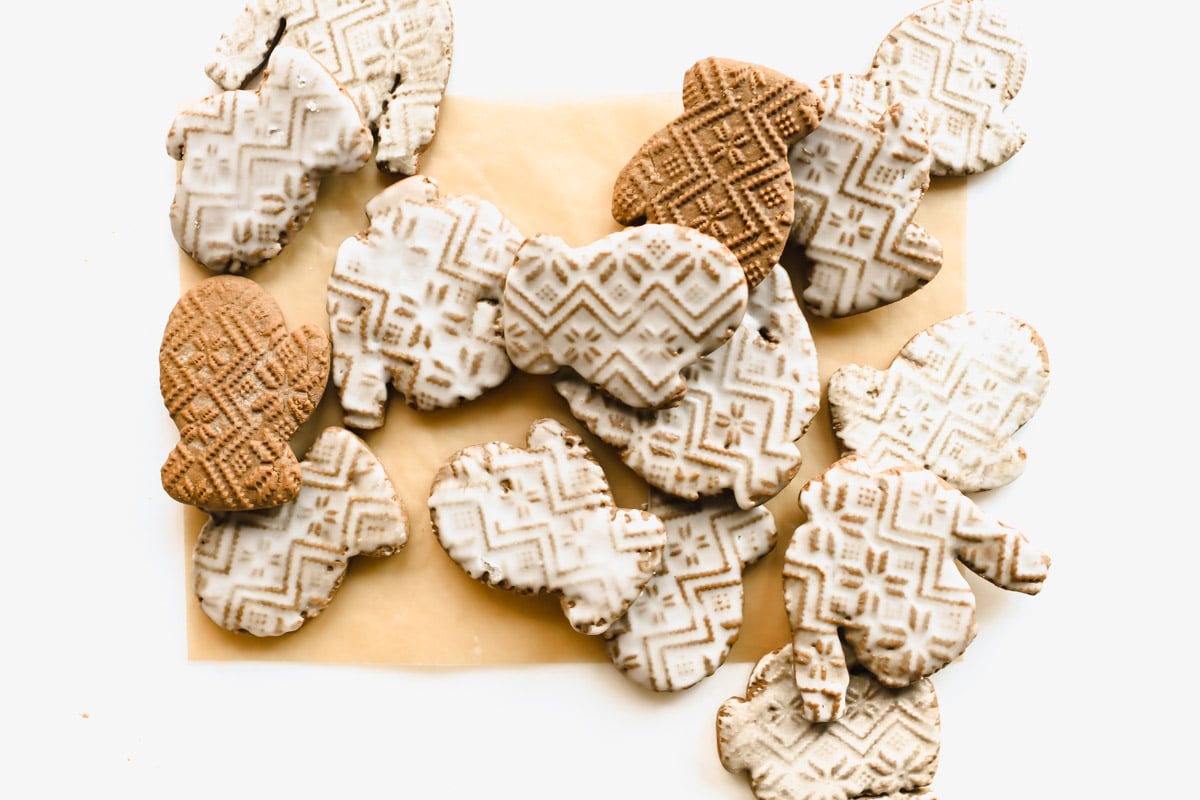
My adorable embossed gingerbread cookies are made with carved rolling pins for a beautifully detailed look that’s practically effortless to achieve. Embossed cookies are the perfect easy Christmas cookie for busy holiday cooks.

WANT TO SAVE THIS RECIPE?
embossed gingerbread cookies are deceptively easy to make!
These adorable mitten and sweater cookies look positively hand knit thanks to my embossed rolling pins. This technique works for creating intricate designs on cookies for the holiday season that only look complicated.
what are embossed rolling pins?
They’re rolling pins that have been engraved with a design so that they decorate your cookies in one easy swipe! This is a fun technique, similar to cookie stamps, but even quicker. Look for embossed or engraved rolling pins in home and craft stores, cooking stores like Williams Sonoma and Sur la Table, Etsy, on Amazon. There are tons of choices!

what you’ll need for embossed gingerbread cookies
Many cookie doughs will work with embossed rolling pins (see my section on choosing a cookie dough below) But I chose gingerbread because I like the way it shows off the design.
- butter
- brown sugar
- molasses
- egg yolk
- all purpose flour
- unsweetened cocoa powder
- baking soda
- ginger, cinnamon, cloves, black pepper
- confectioner’s sugar
- vanilla extract
- salt

supplies you’ll need
- parchment paper
- regular rolling pin ~ you’ll need the regular rolling pin to roll out your dough most of the way first.
- embossed rolling pin
- cookie cutters
- baking sheets ~ plain, un-insulated aluminum pans work best

how to choose the best dough for embossed cookies
You’ll need a roll-out cookie dough recipe that, first and foremost, holds its shape as it bakes:
Gingerbread works nicely because the deeper color shows off the designs nicely. Your dough should be plain, without any inclusions like chocolate chips or nuts. You want the pattern to show up clearly and be the star of your cookies. Spices and extracts are fine. Do not try to use a drop cookie dough, it will be too soft.
how to choose an embossed or engraved rolling pin
LOOK FOR WELL DEFINED ENGRAVING ~ There are tons of these out on the market right now, they’re trending this season. There are different types and you definitely want to choose carefully. Some rollers are quite cheap, and you’ll notice that the embossing is very shallow. These won’t perform well for cookies because the embossing won’t be defined enough to show after baking. Look for rollers with a well defined carving for the best results.
ALSO CONSIDER THE SCALE OF THE DESIGN ~ It turned out that my ‘fair isle’ patterned roller worked perfectly, but the reindeer rolling pin was too large scale for my small cookies.
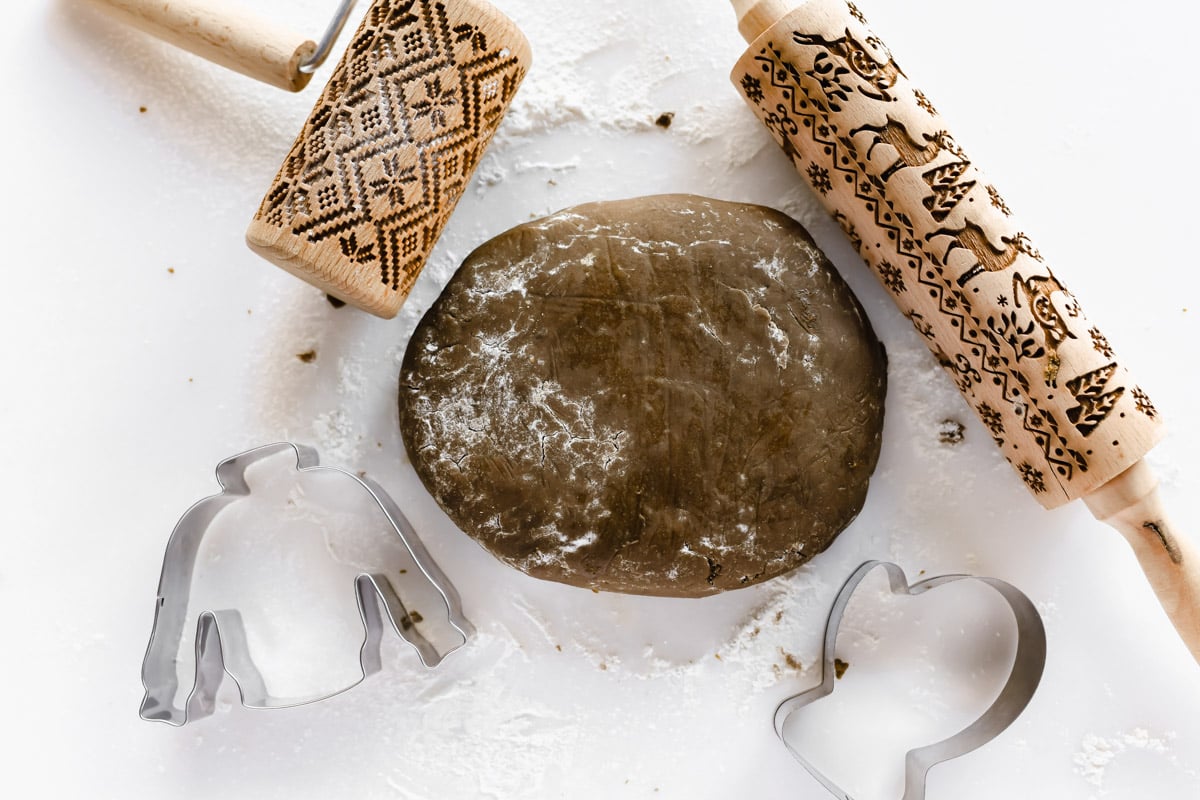
how to choose the best cookie cutters for embossed cookies
Lots of different shapes will work, but look for a cookie cutter that doesn’t have a lot of detail ~ simple shapes are best for showing off the texture. Round cookie cutters work great for embossed designs, so no need to go out and buy anything special. Also stars, ornament shapes, and hearts work perfectly.
My roller design inspired my sweater and mitten choice. A little beanie hat or stocking shape would have worked great, too!

tips for making embossed cookies
Now that you’ve got your recipe and your rolling pin, you’re ready to get started. Here are some tips to keep in mind for best results.
- Do a few test cookies to start off with. You’ll get a feel for how your rolling pin works with your dough and your cookie cutters.
- I did not find any benefit to chilling the dough for these cookies, so use it right away. But if you use a different dough and find your designs aren’t sharp after baking, consider chilling your cut cookies before baking.
- Make sure you flour your surface so your dough doesn’t stick. Sometimes I’ll roll my dough right on parchment paper.
- First roll your dough out to about 1/3 inch thickness. Then take your rolling pin and firmly roll that over the dough. Use a firm, confident pressure. Embossing works best on thin cookies.
- Your rolling pin shouldn’t stick to this dough, but if it does, you can lightly flour the pin itself.
- You’ll need to reform your dough quite often for these cookies, but that won’t affect the final texture, so no worries.

to glaze, or not to glaze
Glazing is an optional step for embossed cookies. They’ll be beautiful either way, but the glaze does add a festive element, which works well for the holidays. I love the way a glaze settles in the design and emphasizes the patterns. The trick is to thin the simple sugar and water glaze to just the right consistency ~ if it’s too thick it will obscure the embossed patterns.
When the glaze is just right it makes the cookies pop! Plus it adds an extra layer of sweetness, always a plus.
what are the spices in glazed gingerbread cookies?
Gingerbread is characterized by molasses along with a blend of spices, but every gingerbread cookie will be unique depending on the exact mixture of spices you use. I don’t recommend using a premixed spice blend, it’s better to use individual spices. If you like you can make your own custom gingerbread spice blend at the start of the holiday season. Then you’ll have it handy for spicing up cocoa, latte, pancakes, or anything that needs a holiday vibe. Feel free to adjust the ratios of the ingredients to your particular taste.
how to make homemade gingerbread spice mix
- 1 Tbsp ground ginger
- 1 Tbsp ground cinnamon
- 1 Tbsp ground allspice
- 1 1/2 tsp freshly grated nutmeg
- 1 1/2 tsp ground cloves
- 1/2 tsp freshly ground black pepper
more gingerbread
- Glazed Gingerbread Bundt Cake
- Glazed Gingerbread Spritz Cookies
- Starry Night Gingerbread Cookies
- Gingerbread Loaf Cake with Cream Cheese Frosting
- Holiday Gingerbread Cake
- Soft Glazed Gingerbread Cookies
- Easy Gingerbread Cookies with Royal Icing

My ‘fair isle’ patterned roller can be found on Amazon, here.

Embossed Gingerbread Cookies
Equipment
- un-insulated cookie sheets
- embossing rolling pin
- cookie cutters
- parchment paper
Ingredients
wet ingredients
- 6 Tbsp unsalted butter, at room temperature
- 1/3 cup plus 2 tbsp dark brown sugar
- 1/3 cup molasses (do not use blackstrap molasses, which is very strong and bitter)
- 1 large egg yolk
dry ingredients
- 1 3/4 cups plus 2 tbsp all-purpose flour
- 1 Tbsp unsweetened cocoa powder
- 1/2 tsp baking soda
- 1 tsp ground ginger
- 1/2 tsp ground cinnamon
- 1/4 tsp ground cloves
- 1/4 tsp ground black pepper
- 1/4 tsp salt
glaze
- 1 cup confectioner's sugar, sifted
- 1 Tbsp unsalted butter, melted
- 1/2 tsp vanilla extract
- 1 Tbsp warm water plus more as needed
Instructions
- Preheat oven to 375F Line baking sheets with parchment paper. Note: the dough has a tendency to stick without parchment paper.
- Cream together the butter, sugar, and molasses, and egg yolk until well combined. Use a stand mixer like I did, or electric beaters. Scrape down the bowl to get everything evenly incorporated.

- Sift the dry ingredients together into a separate bowl and then, with the mixer on low, slowly add to the wet ingredients, mixing just until your dough starts to come together. I like to finish by hand, with a silicone spatula.
- Turn out the dough onto a lightly floured surface and knead it until all the floury crumbles are incorporated. Flatten the dough into a disk and then wrap or cover with plastic wrap. I like to let the dough rest for 15 minutes before rolling.
- First roll out to about 1/3 inch thickness with a regular rolling pin. Then take your embossed roller or rolling pin and roll over the dough with a firm sweeping motion. Cut out your cookies and transfer the dough to your baking sheet. Reform the dough and re-roll as necessary.
- Bake the cookies in your pre-heated oven for about 8 minutes. If your cookies are thicker than mine, they might take a couple more minutes.
- Let the cookies cool for a few minutes on the pan, then transfer to a rack to cool completely before glazing. Note: you don't have to glaze your cookies if you prefer them plain.
- To make the glaze whisk the glaze ingredients together until you get a smooth thin consistency. Add more water if the glaze is too thick, it should have the consistency of maple syrup.
- Brush the tops of the cooled cookies with the glaze. Do a test cookie to make sure the glaze is thin enough that the embossed designs show through after glazing. Let the cookies dry thoroughly before serving or storing. Note: the glaze will become more translucent as it dries.


Notes
- Cookies will keep up to a week at room temperature.
Nutrition


Dough is very crumbly is this normal?
It’s on the dry side but if it’s too dry add a bit of extra moisture like milk (start with just a few drops) and wrap the dough in plastic to allow it to hydrate before rolling.
Could I roll the dough into balls and use cookie stamps? If so, should I shape and then chill and then stamp?
This dough should work with cookie stamps and yes you can roll it in balls for that use.
You say the soft glazed gingerbread cookie recipe is different from the embossed recipe but when I look at them they appear to be identical. Am I missing something?
I see that you’re right. I have well over 2,000 recipes on the site and I do lose track from time to time!
Mixed reviews. My dough was very crumbly . I was worried they wouldn’t turn out but once I started rolling the dough it came together. I didn’t use my embossed rolling pin just cut out Christmas shapes and were very tasty
Got rave reviews from this incredibly delicious cookie!!! Just one quick question, can you freeze the dough to make the cookies at a later date?
Yes, sure! So glad these were a hit! To freeze the dough form it into a flattened disk, and then you can double wrap it in plastic and foil, or put it in a heavy duty freezer bag and force out any excess air before zipping it up.
These are delicious, but they spread pretty badly for me. I chilled the dough for 30 minutes, and even froze the cut shapes for 10 min before baking but the pattern still completely disappeared. I did notice my dough was very soft though, so I’ll try the recipe again as written. Fortunately, no one knew they were supposed to be embossed and the flavor is fantastic!