
Homemade Maple Marshmallows are all natural, no corn syrup marshmallows made with maple syrup ~ instantly upgrade your hot cocoa and other cozy winter sip-ables with these easy refined sugar free treats!

WANT TO SAVE THIS RECIPE?
put some homemade maple marshmallows in a cellophane bag and pop them in a cute mug for a sweet gift.
At least once every winter season I love to immerse myself in a real deal holiday kitchen project. It might be making authentic gingerbread cut out cookies, or maybe graham cracker gingerbread house votives. One year I created a homemade version of Ferrero Rocher truffles. Making marshmallows is that kind of fun holiday project that isn’t hard, but it’s so festive, and in the end you’re left with something delicious and giftable. (Note: mug is from Cost Plus World Market.)

useful equipment for making maple marshmallows
- Ideally you need a stand mixer fitted with the whisk attachment. If not, you’ll need electric beaters. Why? This recipe is easy but requires an extended beating time.
- a clip on candy thermometer
- maple syrup
- powdered gelatin

a simple substitution of maple syrup for corn syrup makes a lovely flavored marshmallow.
Regular marshmallows are usually made with corn syrup or refined sugar syrup, which adds no flavor. But if you simply substitute maple syrup, which is a natural sugar, you get a flavor payoff. You can just barely see the golden tint in the insides of my marshmallows.

how do you make maple marshmallows?
It’s surprisingly simple, really.
- You boil maple syrup to the ‘soft ball’ stage using a candy thermometer to monitor the heat.
- Then drizzle the hot syrup into softened gelatin, while whipping.
- The mixture slowly blooms into a pale sticky marshmallow ‘fluff’.
- You spread out the sticky stuff into a lined pan, and wait for it to firm up.
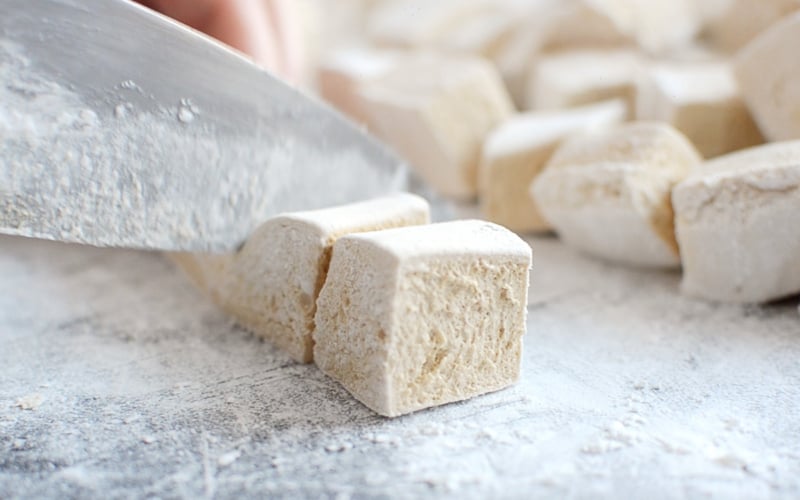
- Once firm you can slice the marshmallows into strips, and then into cubes. Dust all exposed edges in confectioner’s sugar to prevent sticking, and you’re done!

how long will your marshmallows last?
Your homemade marshmallows will last about a month in an airtight container.

what to do with your maple marshmallows (besides just eat them!)
- Pop them in all your hot cocoas, lattes, and steamers
- Snack on them like candy
- Make extra special s’mores

How to Make Maple Marshmallows
Equipment
- candy thermometer
- saucepan with deep sides
- electric mixer
Ingredients
- 1/3 cup cold water
- 1 Tbsp powdered gelatin
- 1 cup maple syrup
- pinch of salt
- confectioner's sugar for dusting the finished marshmallows.
Instructions
- Lightly butter a 9×13 pan and line with a sheet of parchment with long ends. Lightly dust all with powdered sugar. The paper will allow you to lift out the marshmallows for cutting, later.
- Put the water in the bowl of a stand mixer fitted with the balloon whisk attatchment. Sprinkle the gelatin over the water and let sit.
- Put the maple syrup in a relatively deep saucepan, because as the syrup cooks it will foam up. Bring the syrup up to a boil and let cook over medium heat until it reaches the soft ball stage, or 235F on a candy thermometer. There is no need to stir the syrup, just make sure it doesn't boil over. Watch the temperature carefully as it nears the soft ball stage, you don't want to over heat it because it can burn. Be patient, and make sure to get the syrup up to the correct temp.
- Remove the pan from the stove, and turn the mixer on low to mix the gelatin and water. While the machine is going, drizzle in the hot syrup, slowly. When all the syrup is in, raise the speed of the mixer and beat on high until you get a thick, glossy mixture that holds stiff peaks. Add your pinch of salt at this point. Many recipes say to beat for as much as 10-15 minutes, but I find it never takes this long.
- Immediately spread the mixture into your prepared pan. It's sticky, so take the time to get it all out and then spread it as evenly as you can. An offset spatula works well for this.
- Let the mixture sit at room temperature to firm up for several hours or overnight.
- Remove the marshmallows from the pan using the parchment paper sling, and invert onto a surface that has been covered with sifted confectioner's sugar. Carefully peel off the paper. Dust the whole surface with more confectioner's sugar.
- Slice the slab of marshmallow into strips using a long sharp knife. Then cut the strips into cubes. Dust all exposed edges with confectioner's sugar to prevent sticking. Store in an airtight container for up to 2 weeks.


I I am not sure if I did something wrong but followed the recipe and they ended up moist, not dry and I’m not sure if I should have added tapioca starch or something. It’s kind of like a creamy Jell-O?
Hi K ~ did you use the gelatin? That’s what gives marshmallows their firm bounce. And you must get the syrup to 238-240F (you’ll need a thermometer.) If you’re sure to do both of those things the marshmallows will be perfect.
I cannot have cane sugar and am looking for a maple syrup recipe for frosting. Could this be used as a frosting? Pour on cake before it’s cooled? What would the texture be like? Curious if anyone has tried this.
Hi Bonnie, this recipe won’t work as a frosting because the marshmallow gets firm and spongy when it sets up, so not really appropriate.
Mine came out good but they seem moist? Are they suppose to. To be??
The marshmallows are somewhat sticky until you dust them with the powdered sugar. That’s a key last step.
A great recipe! Super easy with a stand mixer and a candy thermometer. I do think the 9×13 pan is waaaaay off in terms of obtaining marshmallows that look anything like the header photo. You’d need to increase the recipe by at least 50%, if not fully doubling it. That aside, it is a great and easy recipe and I’ll make it again!
Glad you enjoyed these! Fyi the pan is just used for spreading out the marshmallow on a flat surface, you don’t need to fill the pan. Spread it out quickly to the thickness you’d like your marshmallows to be.
I think I burned the maple syrup because my candy thermometer wasn’t submerged at least 2 inches like it’s suppose to be. I’d rather not double the batch until I’m confident I can make it correctly but if I use a more narrow pan I’m afraid it’s going to boil over. Does the candy thermometer being submerged 2 inches affect much?
Thank you!
Great recipe! Thank you!
Is there an alternative to coating the marshmallows with powdered sugar?
Not really. But you can cut the sugar with cornstarch if you like.
Yes! I coat mine with arrowroot powder 😉 and if you’re feeling fancy you can add cinnamon, cocoa, or chai spices.
I use powdered maple sugar and it works splendid. I just powder maple sugar in my vitamix. I’ve seen people use tapioca starch in other recipes but I haven’t tried it!
Oooh I need to try that!
Any thoughts on how to make rice crispy treats with this?
I haven’t tried that so I’m not sure ~ let us know if you experiment!
I’ve seen rice krispie treat recipes with homemade marshmallows. After the marshmallows are set (and sometimes even before depending on the recipe) you add melted butter in after it fluffs but before it hardens. Then add to the cereal. There is a short window on time.
So good!! I usually make this with different ratios, but yours is in the dish now looking great:)
I did forget the salt. Is this batch going to make it? Will it still be good for 2 weeks?
Thank you!
Omitting the salt won’t be a problem, no worries there. The marshmallows should last 2 weeks, in an airtight container.
These are delicious, and I love that the flavor and lack of refined sugar. I would definitely recommend either doubling the recipe for a 9×13 (if you want a full pan of thick cubes) or using a smaller 8×8 with 1x recipe.
Perhaps there are differences in maple syrup or something?