
My peanut butter scones are so moist and tender they literally melt in your mouth!

WANT TO SAVE THIS RECIPE?
peanut butter scones are a new fave
This isn’t your proper English scone, for sure, but omg it’s a winner. Maybe I should dub it an American style, scone, because it’s loaded with that all American duo, chocolate and creamy peanut butter. After many many years of developing and baking scone recipes, I think I may have hit on my absolute favorite. This one is soft and tender, and the peanut butter presence is just perfect. It’s nice and sweet, but in a middle of the day sort of way. In other words, these peanut butter chocolate chip scones are perfect.

I broke tradition with this peanut butter scones recipe…
If you know me you know I love pb and chocolate together. Have you ever had my Peanut Butter Chocolate Chip Shortbread Cookies, or my Classic Peanut Butter Bars?
- And while I usually like to use regular homogenized pb like Jiff in baking, for these scones I actually prefer a drippy, natural peanut butter.
- As for the chips? I broke tradition again and used milk chocolate. Dark is my usual preferred chocolate, but milk chocolate makes these scones utterly perfect.
Why do I use cornstarch in my scones recipe?
- Cornstarch is the secret ingredient if you want to bake tender scones.
- The cornstarch plus flour in this recipe mimics the use of cake flour. (Yup ~ cake flour is simply flour that has cornstarch added to it.)
- Cornstarch does not contain gluten, and so lightens the dough and makes for a soft, tender scone.
- I always have cornstarch in the cupboard and use it often for baking shortbread and scones.

The best (and a little controversial!) method for making high rise flaky scones
- I swear by the food processor method, it makes scones quick, easy, mess free, and perfect every time. It’s the same way I make my pie dough, too.
- I pulse the dry ingredients together to combine.
- I drop in cubes of cold butter and pulse until fully incorporated and ‘sandy’ in texture.
- I add the liquid and pulse/run the machine just until the dough comes together.
- I fold in any add-ins by hand.
- I shape the dough into a disk, then refrigerate it while I clean up and preheat the oven.
- Then I’ll slice it into triangles, and bake up the flakiest scones ever!

make fresh peanut butter scones ahead of time
Yes, you can refrigerate your scone dough overnight in the fridge, and bake it up fresh in the morning…
- After you’ve formed your scone dough into a disk, wrap it up tightly with plastic wrap and place in the refrigerator overnight.
- In the morning preheat your oven before removing the dough from the fridge, you want it to stay cold.
- Line a baking sheet with parchment, place the disk on top, and slice it into 8 triangles with a large sharp knife.
- Bake as directed.

How to freeze and thaw baked scones
Maybe you’re just one or two in your house, or maybe you have no self control, but freezing scones is a handy thing and luckily these freeze beautifully.
- The best way to freeze scones is to wrap them individually.
- Let them cool completely. Then wrap each one in plastic wrap, and then in foil.
- They’ll be great for 3 months.
- To defrost, just remove the package from the freezer and let thaw on the counter. To prevent any condensation from making the outside of your scone soggy you can unwrap it. I usually don’t bother.
- You can zap the thawed scone in the microwave for about 20 seconds, or until warm throughout. Some people prefer to rewrap loosely in foil and set in a 300F oven for 5-10 minutes.

How to freeze and cook unbaked peanut butter scones
- Set the unbaked scones on a parchment lined baking sheet and freeze until solid, about an hour.
- Wrap each scone in plastic wrap, then stash in heavy duty freezer bags, pushing out any extra air before zipping. Label with the date.
- The scones will last one month.
- To bake, remove from the freezer, unwrap, and set on a parchment lined baking sheet. Preheat the oven. By the time the oven is preheated, the scones will be partially softened. Bake as usual, perhaps adding a few extra minutes if necessary.

Peanut butter scones are so rich and delicious they don’t need anything else with them, no butter, no clotted cream, no nothing. But if you’re a scone type of person you might be interested to see my Homemade Clotted Cream recipe. IP lovers will want to check out my Instant Pot Clotted Cream recipe, or my latest innovation: Stove Top Clotted Cream!
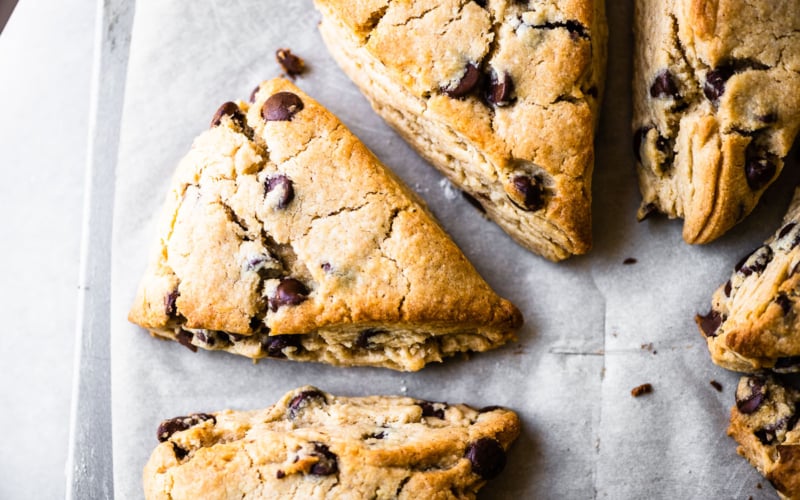
I think you can see in these photos how tender these scones are…just look at those lovely cracks! Never trust a scone that’s completely smooth 🙂 Follow the instructions exactly and then let me know what you think. Scratch that, I already know what you’ll think 😉

featured comment
“I rated this 5 stars, yum! I’ve never made scones before, this recipe turned out perfectly for me. Luckily I have 5 kids to share them with or I would eat all of them! The only thing that I had to change was the baking time for me was closer to 20 minutes. I will definitely make these again.”
Tina

Peanut Butter Chocolate Chip Scones
Equipment
Ingredients
dry ingredients
- 2 cups all purpose flour, (fluff the flour before scooping and leveling)
- 1/4 cup cornstarch
- 1/2 cup granulated sugar
- 3/4 Tbsp baking powder
- 1/4 tsp baking soda
- 1/4 tsp salt
butter
- 1/2 cup cold unsalted butter, cut in pieces
wet ingredients
- 1/2 cup heavy cream
- 1/2 cup natural style creamy peanut butter
chocolate
- 1 cup milk chocolate chips
Instructions
- Line a baking sheet with parchment paper.
- Put the dry ingredients in the bowl of a food processor fitted with the blade and pulse to combine.
- Add the pieces of cold butter and pulse about 25-30 times to get the butter really incorporated in small bits. The mixture will be sandy.
- Measure out the heavy cream in a glass measuring cup and then pour in the peanut butter to make 1 cup.
- Add the wet ingredients to the processor and pulse/process just until the dough comes together in a lump or lumps.
- Turn out into a bowl and fold in the chocolate chips, then turn out onto a lightly floured surface and pat into a smooth 7-8 inch disk. Wrap with plastic and refrigerate for an hour to an hour and a half.
- Preheat the oven to 400F
- Slice the chilled dough into 8 scones with a large, sharp knife, and place on the baking sheet, leaving 2 inches between scones. Bake for about 15 minutes until the scones are firm and baked through. Look closely at the cracks in the top of the scone, if they look wet inside, bake a little longer. Don’t over bake. Note: you can place the scones closer together in a ring shape if you like the sides to cook into each other, pull-apart style…this makes a softer scone.
- Let cool on a rack for a bit before devouring.


Just amazing best recipe yet. Beat mine for sure. So easy but I did add a little twist. When I took them out of the oven I added a little whipped honey peanut butter. I bake for our local sample store so I divided them into mini cup cake holders. They were gone in less than 30 minutes. A sure winner.
I don’t have heavy cream, it’s way too expensive here. Can I use evaporated milk?
I haven’t made scones with evaporated milk but I’m sure it would work. Buttermilk works well, too.
Can I use a gf flour like oat or almond? Thanks for the recipe!
For baking it’s usually best to use an all purpose gf baking blend, because if you use just almond or oat flour, the scones won’t hold together well. I recommend Bob’s Red Mill, King Arthur Flour, or any other you’ve used and like.
Can I use a ninja instead as I don’t own a food processor?
I don’t think a blender will work, but you can make scones by hand, just work in the butter with a pastry cutter, or even forks. It will take a little longer, of course.
Used regular peanut butter. Result was so tasty but dough wouldn’t stick together even after refrigerating overnight. Do you suggest adding more cream or a bit of oil to compensate? Definitely making again !
It could have just been small differences in the measuring of the flour and wet ingredients. Whenever your dough is so crumbly it won’t stick together, feel free to add a small amount of liquid to fix it.
I love these scones they are absolutely delicious! They taste like a peanut butter cookie with chocolate chips! Yum;)
I’m so glad you loved these, they’re one of my personal favorite recipes 🙂
Made them exactly as directed, and they are absolutely delicious, but I’m thinking of them as a giant peanut butter cookie. Yum!
This sounds and looks amazing but my son is allergic to peanuts. How do I modify to make these and still have the same consistency if I don’t use peanut butter?
If your son can tolerate almonds, I’d use almond butter.
These scones are amazing!Making them in the food processor was so easy Definitely making these again!
I’m so glad you liked these Sandy 🙂
I would love to make these this weekend, they look delicious!! But…I don’t have a food processor, what should I do to mimic this for a similar result??
You can cut the butter into the flour with a pastry cutter, or two forks. It will take longer, but can be done.
I don’t have food processor either!! What can I use??? HELP PLEASE!! AND THANK YOU!!
You can cut the butter into the flour with a pastry cutter, or two forks, even. The idea is that you want very small pieces of butter thoroughly mixed into the flour. If you’re doing it by hand you can also freeze the butter and actually grate it on the big holes of a box grater.
I grate my butter into the dry ingredients and then sand it in with my hands. My fav method
Can you use this recipe with other fruit like blueberries or anything else? Maybe more sugar something sweet. Looking forward to hearing from you.
Yes, but you might use another scone recipe on my blog as your base. I just made cranberry orange scones that I haven’t posted yet. I would use my Rhubarb Scones as your base, and change up the fruit from there.